
Hello Everyone,
So glad you could stop by. Sorry I had to take some time off from my classes. Life kind of got in the way a little bit. But I’m back and excited to share my card for my third class for the Altenew Educator Certification Program. If you’re following my journey you know that I have to take a series of 25 classes to earn a teaching certificate. The card I had to make for this particular class is a Clean and Simple card. Basically, it’s taking a piece of cardstock folded and making a simple design on it with a sentiment. Something that is quick and simple.
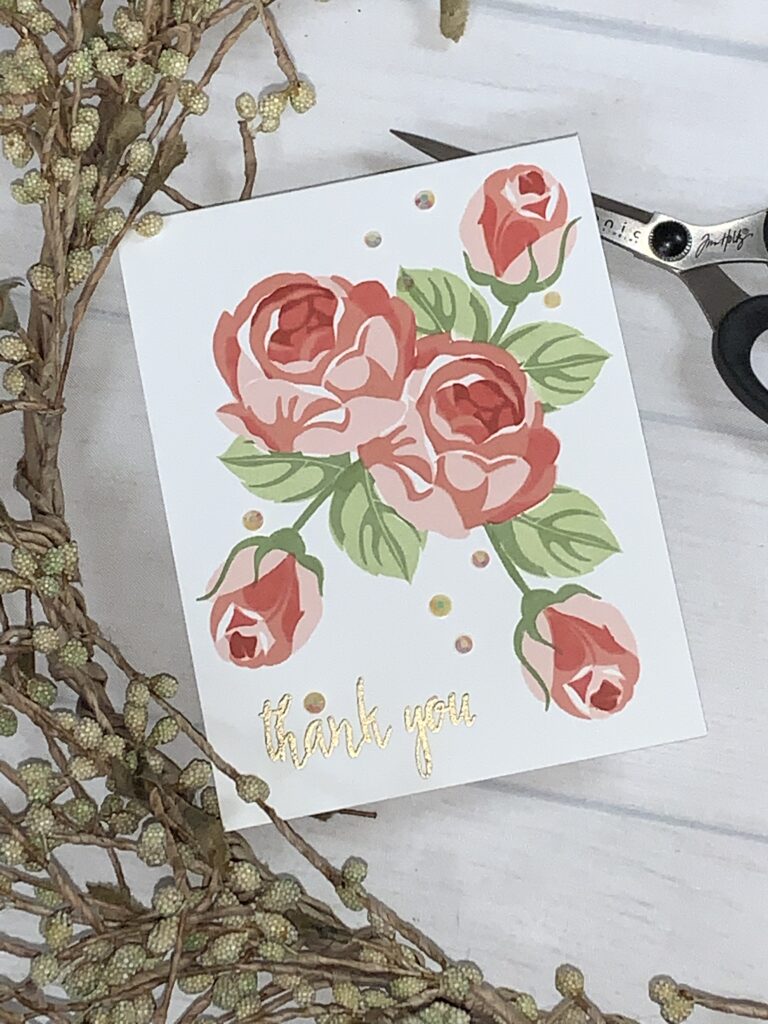
So let’s get started. I will be using the Altenew Rosy Outlook Stamp set and the Altenew Many Thanks Stamp set. All the stamps are labeled so you know which images go together. They have A1, A2, A3 and A4. So you know A1 is the first stamp and A2 is the second stamp and so on.
I used the Misti stamping tool to do all the layering. I love using the Misti whenever i am doing stamped layering. It makes it so much easier to line up the stamps. But you can use an acrylic block is want to.
First I line up my most solid image (A1) on the front of a piece Neenah Classic Crest 110lb cardstock. Folded to a A2 size top folding card. The dimensions are 4 1/2″ x 11 1/2″ and scored at 5 1/2″. I always start with the lightest color first on the most solid image. I ink up my stamp with the Altenew Blush Ink. I double stamp it to give it a really good impression as this is the main color of the flower. Then I place the the same stamp (A1) where I want it to go. Once I have the next image all set, I will then use my Altenew Rosy Outlook Mask to cover the first image. I love the masks you can buy from Altenew because they fit perfectly on the images, but you can make your own mask by stamping the solid image and then fussy cut the image out. I also use removable adhesive on the back of the mask to hold it in place. I don’t like to use that strong of adhesive on the back of the mask because I don’t want it to ruin the image. If the masks comes up when you are stamping…… Not a big deal. Just put it back on the image 🙂 I double stamp this image to get a good impression.
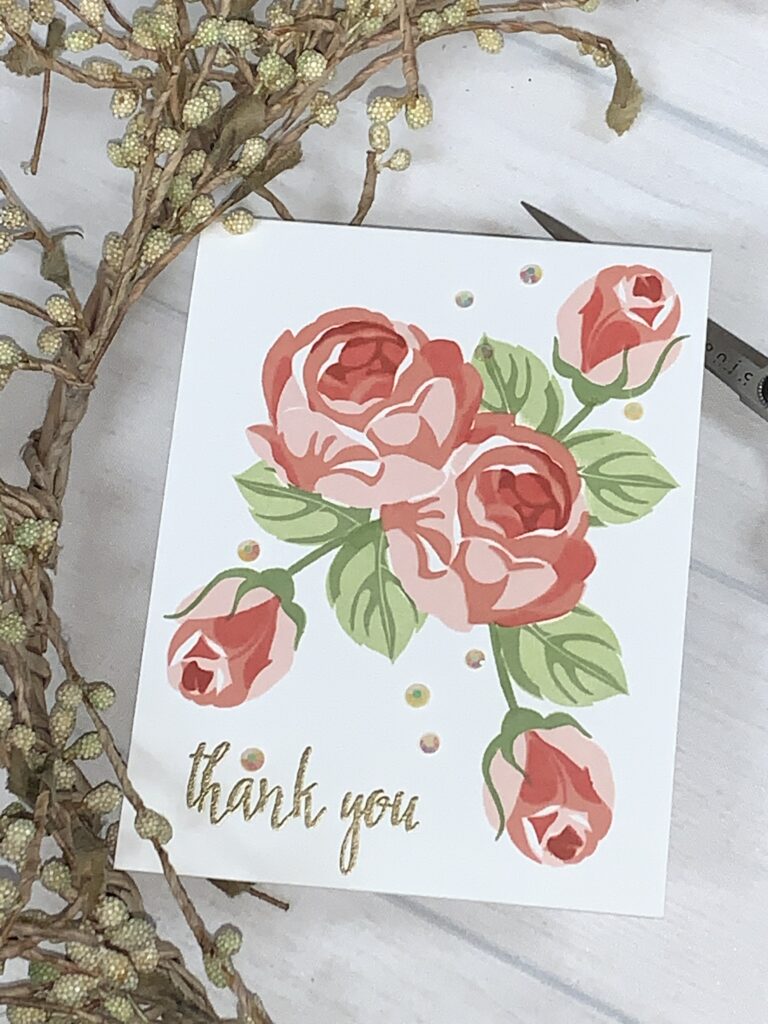
Keeping the mask where it is, I then bring in my second stamp (A2) and line it up on the image.I stamp it with the Altenew Rouge ink which is my second darkest color. I did decide to double stamp this as well to make it darker. I then take the mask off of the flower and place the second image on that flower. I use the Altenew Rouge ink and double stamp the image. Then working on the same flower I bring in the third image (A3). Using the Altenew Crimson ink I stamp the image. Now moving to the next image I place the third stamp on the flower. Then I bring the mask back in and put it on the first image. I then stamp the flower with the Altenew Crimson ink. When I’m done I bring in my fourth image (A4). I line it up in the center of the first flower. I stamp it using the darkest color which is the Altenew Velvet ink. When I am done stamping the image I move the stamp to the second flower and stamp it with the Altenew Velvet ink.
Once I do this I now have to really start thinking about the layout of the card, since it’s a single layered card. I take the solid image of the Rose Bud stamp and put it where I want it to go on the card in 3 different spots. Using the same exact process a the Rose Images, I stamp my solid image with the Blush ink, the second image with the Rouge ink, the third image with Crimson ink and the final image with the Velvet ink. (to see this in action check out my Youtube video listed below)
Then I stamp the bottom of the flowers and the stems with the Altenew Forest Glades Ink. Using my masks again, I cover the flowers. This will give the impression that the leaves are behind the flowers. Then I stamp the leaves all around the card. Stamping the most solid image first (E1) with the Altenew Frayed ink. Then stamping the third image (E3) I stamp on top of all the solid images using the Altenew Forest Glades ink. I chose not to use the second image (E2) at all. You can mix and match any of the images. You do not need to use all the layers if you do not want to.
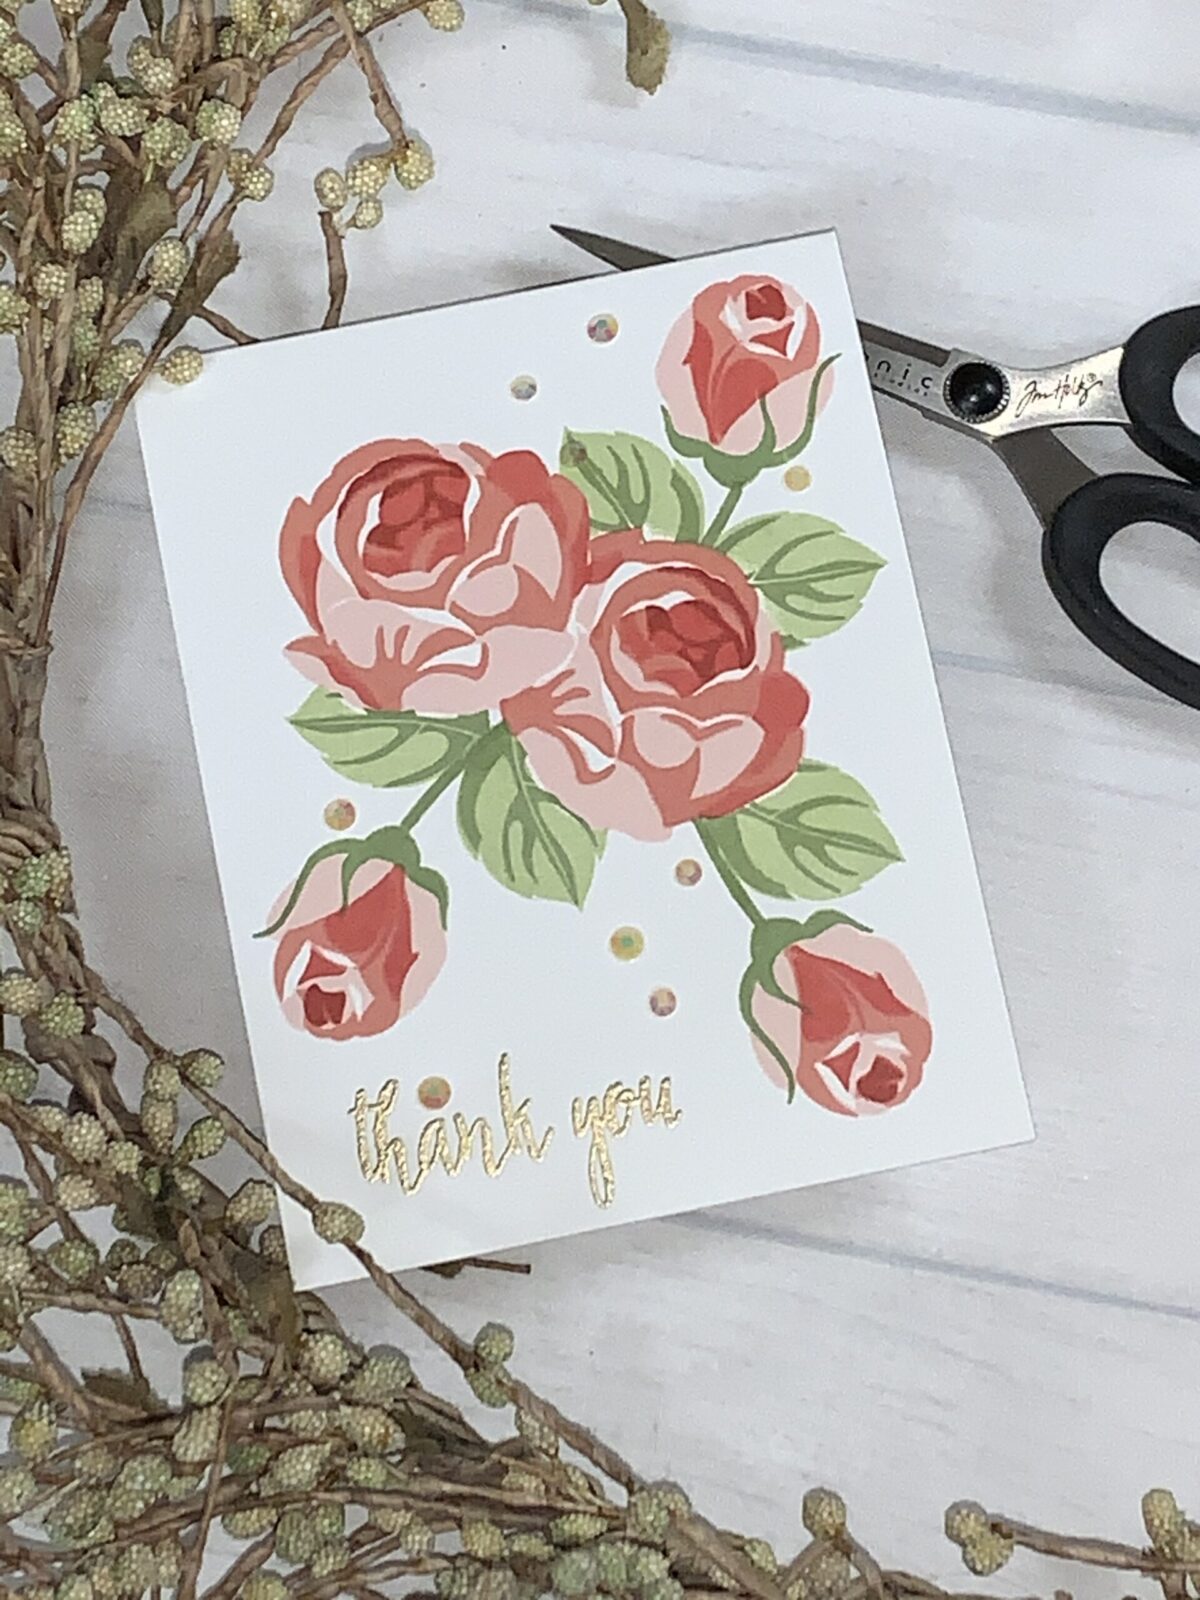
Once the flowers are done. I will then use the Altenew Many Thanks Stamp set to heat emboss the Thank You sentiment on to the card. First I use the Anti-static powder bag to wipe the paper down (This helps to prevent embossing powder from getting where you don’t want it). Then I ik up the stamp with Versafine Ink. Once I’m done I shake the Ranger Gold Embossing Powder on the sentiment. Then I use my Heat Gun tool to heat the embossing powder.
I always like to add sparkle to my cards :). So I’m going to use my Pinkfresh Studio Jewels. They have a variety pack that is just AMAZING. So many colors to choose from! I decided to use the Peach color. I lay them out on my card where I want them to go. Using my Jewel Picker and my Art Glitter Glue I glue them to the card.
And that completes my card for today. If you would like to see how I made the card, please watch my Youtube video listed below.
I am entering my card in the following Challenges:
1.Penny Black and More – July More in the Garden – 8-1
2. Through the Craft Room Door – Anything goes 7-26
3. Word Art Wednesday – Anything Goes #448-449 – 7-2
4. Daisy Chain Challenge – No Design Paper 8-3
5. D.L. Art – Anything Goes – July – 8-3
6. Crafts Galore – Anything Goes – 8-2
7. Cardz TV – Anything Goes – 8-2
8. 613 Avenue Create – Anything goes – 8-2
9. Polkadoodles Craft Challenge – Anything Goes– 8-2
10. Ally’s Angels – Anything Goes – 8-2
11. Allsorts – Flowers all over – 8-2


Absolutely stunning!!
LOVE IT!
Thank you for entering your work to the AECP assignment gallery.
Thank you so much Erum. I appreciate your feedback!
So pretty, loved the video too!
Thank you!
Thank you so much for participating in Polkadoodles Anything Goes Challenge week #29-https://polkadoodle.blogspot.com/
Your card is absolutely beautiful and I enjoyed your video where you shared your technique of using the mask and all the layering steps involved.
Sybil B. my blog link: https://sybilb28.blogspot.com/
Your card is lovely but I cannot see the link to Allsorts
Hi Wendy, Thank you. I’m not sure what happened but I added the link. Thanks for pointing it out to me.
Thank you so much. I appreciate the feedback!
Such a great take on the CAS card !! … thanks for joining in with week 29 https://polkadoodle.blogspot.com/ ….hugs Nelly DT x
you can follow my blog HERE https://heshaw.blogspot.com/
Thank you so much!
Beautiful floral card.
Thank you for sharing at Allsorts
and over at Penny Black and more;-))m
Thank you!
Wonderful CAS card, but created with hard work! Beautiful video!
Thank-you for joining us at the Crafts Galore Encore Challenge July “ATG”.
Ileanaxx
Thank you!
A pretty floral creation, many thanks for joining in with our ‘In the Garden’ theme at Penny Black and More challenge.
B x
Thank you Brenda!
Your skills are super impressive. I love everything I see here!
So glad you have shared this with us at 613 Avenue Create.
Please come back again!
The best of luck with your entry.
Jackie, DT member at 613 xx
Thank you Jackie. So thoughtful!
Thank you for joining the DL.ART JULY LINKY challenge
This is just beautiful!! I love it.
Thank you for your inspiration!! Have a blessed day
DIANA L.
DL.ART
http://dianamlarson.blogspot.com
Thank you Diana!
Great CAS card-love the beautifully coloured flowers.Thank you for joining us at Daisy Chain
Carol DT x
Thank you Carol!
Great card, well done! Thanks for joining us at Daisy Chain Challenges.
groetjes, Ellen
Thank you Ellen!
this is a stunning make and your video is wonderful at showing how you achieved it. I thought originally it was one stamp but in layers, so much work. Well done for being in the top 5 at Allsorts, well deserved.
Thank you for choosing my card. I am so excited!
Beautiful work! Thanks for an awesome response to our challenge at 613 Avenue Create!
Hugz,
Chana Malkah, Owner
Thank you Chana!
Congratulations! You were selected as a TOP ROCKER for the week of July 19-24, 2020 at 613 Avenue Create! Thanks for your inspiring submission to our challenge. Please stop by our blog and grab your badge! ~~~The 613 Design Team.
Simply beautiful card. Thanks so much for sharing with us at Love To Craft! XOXO, Aimeslee DT
Thank you Aimeslee!