
HI EVERYONE,
Welcome! Hope everyone is having a great day. Today I am excited to share that I was accepted into the Altenew Educator Certification Program. This is kind of like a college for papercrafters .. 🙂 This course will allow me to get certified as a teacher. I have to take a series of 25 classes and document my journey along the way.
I am very excited to be able to share my journey with everyone. I have been crafting for a long time but these classes will allow me to grow and sharpen my skills even more. I will attach the link below if anyone is interested in getting certified.
https://altenew.com/pages/altenew-educator-certification-program
The card I am making today is from my first class called All About Stamp Layering 1.
I will be using the Altenew Vintage Roses Stamp and Die Set along with The Stamping Village “Thinking of you” Stamp set (The Stamping Village stamp set is a collaboration of 12 companies that came together to make a fabulous stamp set to honor servicemen and women, nurses, doctors and other important people in your life. With every sale of this stamp set $5.00 will be donated to the Save the Children. This is such a great cause.)
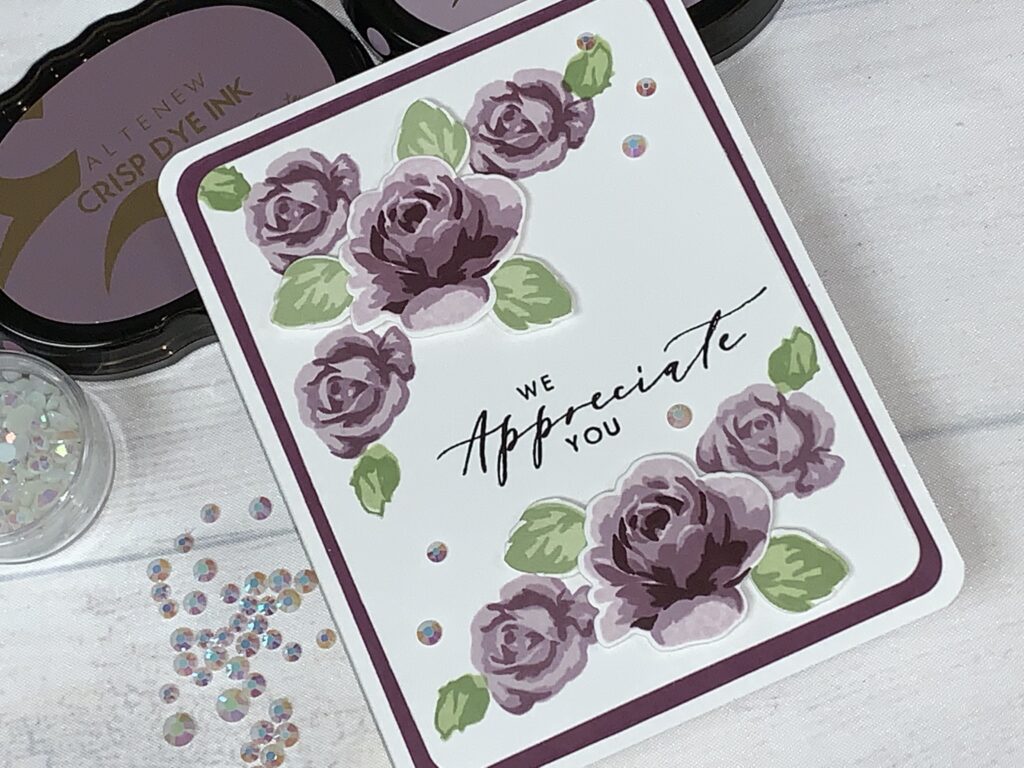
This Stamp set can look very intimidating at first because it has a lot of stamps in the set but once you get the hang of it, it’s not that difficult. This stamp set has a layering guide that helps you to know exactly where to line up each stamp. I learned all about this in my class and it really helped me to line up all my images.
I will be using my Altenew Inks. I like using these inks because they take the guesswork out of what colors work best together.
First I put my most solid image in the Misti stamping tool and use Pale Mauve to stamp the first image on to white cardstock. Then I placed the second image in the Misti and stamped it with Amethyst. I continued on to the third stamp using Grape Agate to stamp the image. Finally I stamped the final image using the Plum Ink. When I was done, I stamped leaves onto white cardstock with my acrylic block (I found it was easier to use for such small images). I used Frayed Leaf for the first image and I used Forest Green for the second image. When I was done, I die cut all the pieces using my Sizzix Sidekick machine.
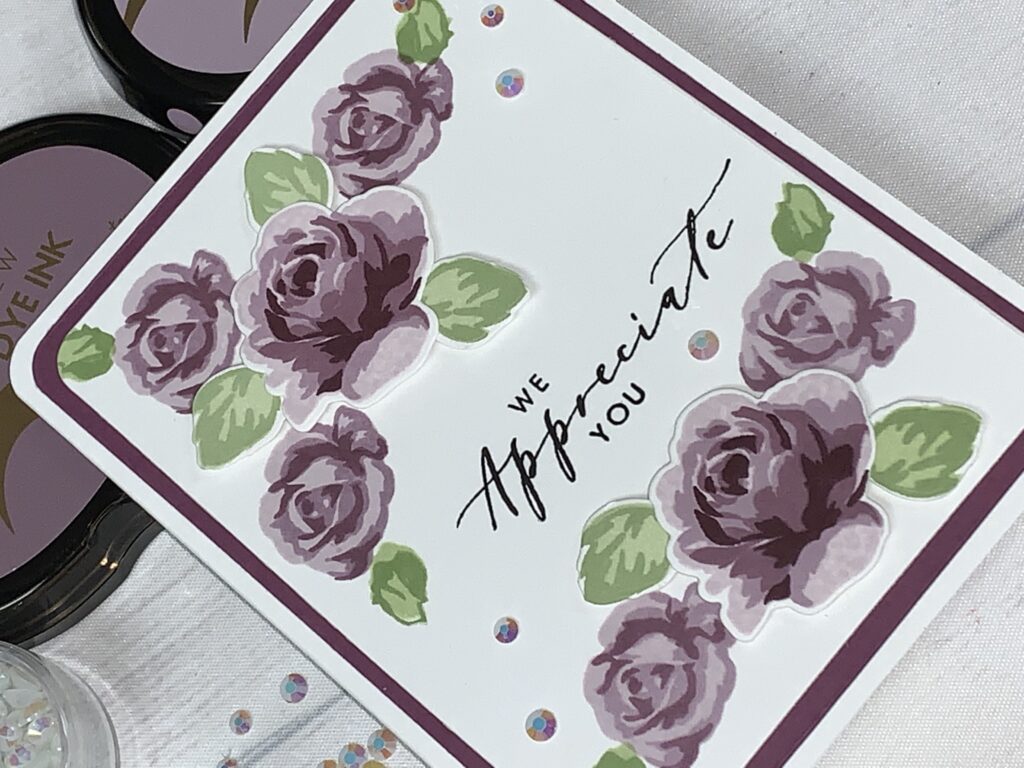
After I die cut all my pieces. I then cut a piece of white cardstock to 3 11/16″ x 4 7/8″ using my Hero Arts Rounded Infinity Dies and my Gemini Jr machine. Then I put my paper in the Misti Stamping Tool. Here I stamped my three layered rose directly on to the paper. Again, I start with my most solid image and stamp it with Pale Mauve. On the second image I used Amethyst and I the final image I used the Grape Agate ink. I stamped three roses on the top of the card and two roses on the bottom of the card. Then I continued to stamp leaves next to the roses. I used the Frayed Leaf for the solid image and Forest Glade for the second layer. These are my two favorite colors to use when I am stamping leaves.

I will then stamp the “We Appreciate You” sentiment from The Stamping Village stamp set using Altenew Obsidian Black Ink. When I am done I start to assemble my card. I take the Rose panel and adhere it to some Gina K Plum Punch cardstock that was cut to 3 7/8″ x 5 3/16″ using the Hero Arts Rounded Rectangle Infinity dies again. Once I do this I then adhere the entire panel to white cardstock that was folded to 5 1/2″ x 4 1/4″. Once my card is assembled I use foam tape to adhere one of the roses to the top of the card and one of the roses to the bottom of the card. I use the foam tape to give the roses dimension. Then I continued to add foam tape to the back of the leaves and adhere them to the card.
When my card is done. I use Pinkfresh Studio Gems to give some sparkle to the card. To finish the card off I use my Journey Corner Rounder to round off the corners of the card. +
That completes this card. I had a lot of fun making this card. I hope you enjoyed it as well.
Check out my Youtube Video below to see all the details on creating this great card. If you like the video, please click the Subscribe Button. Thanks, and have a wonderful day!


Very pretty card! I am in class #17 also and look forward to seeing your future cards.
Thank you Karen. I haven’t really had a chance to look at everyone’s cards yet. I’ve been working really hard trying to get my blog set up. That’s why I am a little behind everyone 🙂 I’m looking forward to checking out everyone’s cards. Excited to be in the group!
Oh, I’m so glad I’m not the only one. I finally had to take a break in my blogging research to actually take a class and do an assignment. 😂! Hope to see your project soon! Enna.
Oh wait, you are Dawn! Ha! I already left a comment, but I might as well leave another! I’m Enna and I’m in your Group 17 as well. I just finished my first post & thought I’d make the rounds and see who is in this group and what you’re all making. I love the colors you chose for your card (I need that set of inks) and your composition. And you’ve already got your site secured. I can’t quite figure out why mine is not. Anyhow, great job! I’ll be back when I’m into Layering 2. Hugs! Enna.
AMAZING!!! Congrats on your first submission for AECP! Very well done! Nice job on the post and the VIDEO! You made a video! So happy that you did! Your card turned out beautiful, the colours look gorgeous. Super job!
Thank you for entering your work to the AECP assignment gallery.