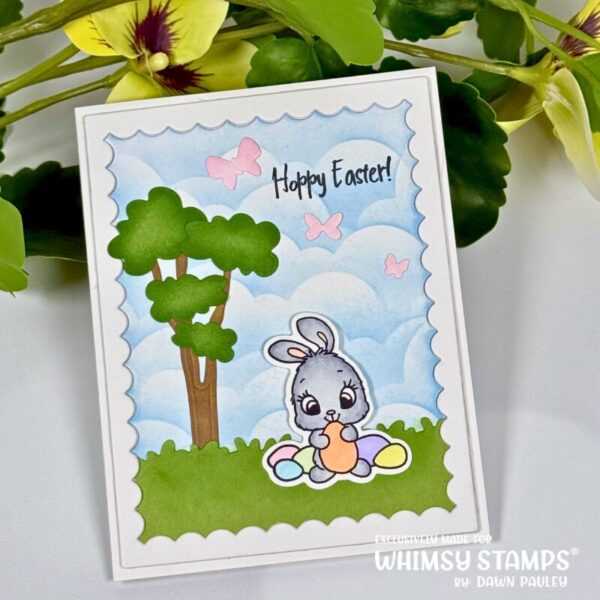
Looking for an easy Easter card idea that’s cute, soft, and perfect for spring? Today I’m sharing a Whimsy Stamps Easter bunny card tutorial featuring a beautiful ink blended cloud background, simple coloring, and an adorable spring scene.
This handmade Easter card is perfect for beginners and experienced card makers alike. If you love scene building cards, Distress Oxide ink blending, and cute bunny stamps, this project is for you!
How to Make an Easter Card with Ink Blended Clouds
Creating a soft cloud background is one of my favorite techniques for spring and Easter cards. It adds just the right amount of interest without taking away from the focal image.
For this card, I used the Inverted Scalloped Die to create a layered frame design and used the center panel for my sky.
Ink Blending the Cloud Background
To create the clouds, I used Distress Oxide Ink in Tumbled Glass, which is my go-to color for skies.
I also used a stencil that I created from the Grass and Cloud Border Die. This is a great way to stretch your dies and get even more use out of them!
Here’s how I created the clouds:
- Place the stencil over your cardstock
- Lightly blend ink along the edge of the stencil
- Keep the ink darker near the stencil edge and lighter in open areas
- Move the stencil as you go to create natural-looking clouds
💡 Pro Tip: You don’t need to blend the entire panel—just focus on the upper portion since the bottom will be covered with grass.
Adding a Grass Border for a Spring Scene Card
To build my spring scene, I added a grassy border using the Field of Butterflies Die Set.
This die set is incredibly versatile—it includes grass, clouds, and small butterflies that are perfect for Easter cards, spring cards, and even birthday cards.
I die cut the grass from green cardstock and trimmed it to fit my panel.
💡 Optional Tip: Add ink blending to the grass for extra dimension. I skipped it this time, but it’s a great way to elevate your card.
Copic Coloring an Easter Bunny (Simple & Soft Look)
For the focal point, I used one of the images from the Easter Bunnies Stamp Set.
This set is perfect if you love cute Easter stamps—it includes multiple bunny images and coordinating sentiments.
Copic Colors Used:
- C5 Cool Gray – for shading along the edges
- C3 Cool Gray – to blend and fill the body
- R11 Pale Cherry – inside the ears and nose
You can keep the coloring super simple here. Even minimal shading looks great on this image.

Coloring the Easter Eggs
For the eggs, I used Ohuhu markers in soft pastel colors:
- Coral
- Pale green
- Pale yellow
- Light blue
- Light purple
- Light pink
I also used the same light pink to color the butterflies for a cohesive look.
How to Build a Dimensional Card Layout
This card design uses layered frames to create depth and dimension.
Step-by-Step Assembly:
- Adhere one scalloped frame to an A2 card base
- Add the cloud background panel to the center
- Attach the grass border (leave the top edge unglued for layering)
- Stack and adhere two additional scalloped frames for dimension
- Place the layered frame on top to hide edges and add depth
This technique is perfect for creating a clean but dimensional handmade card.
Adding a Tree for a Cute Easter Scene
To complete the scene, I added a tree using the Slimline Meadow Die Set.
Even though it’s designed for slimline cards, you can easily adapt elements like this tree for A2 cards.
Quick Ink Blending Details:
- Tree trunk: Distress Oxide Walnut Stain
- Leaves: darker green ink around the edges
I trimmed the trunk slightly and tucked it behind the grass for a seamless look.
Finishing Touches for Your Easter Card
To complete the card:
- Stamp the sentiment “Happy Easter” directly onto the sky
- Adhere the bunny with foam adhesive
- Add butterflies to create movement in the scene
These small details really bring the card to life and give it that finished, polished look.
Easter Cardmaking Tips for Beginners
If you’re new to cardmaking, here are a few helpful tips:
✔ Keep your coloring simple
✔ Use dies to create easy scenes
✔ Try ink blending for soft backgrounds
✔ Layer elements for dimension
✔ Don’t overthink placement—just have fun with it!
Final Thoughts: Cute & Easy Easter Card Idea
This Easter bunny card with an ink blended sky is one of my favorite types of cards to make for spring. It’s soft, cheerful, and easy to customize with different colors and elements.
If you’re looking for Easter card ideas, this is a great one to try—especially if you enjoy ink blending and scene building.
Thanks so much for stopping by my blog today. I hope this card inspires you to pull out your stamps and pattern paper and get crafty. Happy crafting!
If you give this card a try, I’d love to hear about it!
Happy crafting,
Dawn
I have attached a list of the products I used to create this card if you are interested.
I also have a 15% off your order code for the Glassboard Studo Glass Mats. – DPAULEY15
Affiliate Links may be used at absolutely NO Charge to you. All items have been personally purchased by me except for the Whimsy Stamp products which are supplied for being on their Design Team. I do not work for any of these companies. Whether gifted or products I bought, I only recommend products I personally use and like. All opinions are my own. Proceeds I make off of the affiliates helps me to offset some of the cost to maintain my blog, YouTube channel and supplies needed to bring you new content.
Copyright: I am happy to share my creations with you. I don’t mind if you use them for your own personal use. If you decide to share what you’ve made online, please link back to my Youtube Channel or Social Media post that inspired your design. While I love this and encourage it. It is NOT ok for someone to sell anything that was created by my design or to use my photos for any type of compensation. I appreciate your understanding in this.
D Pauley Designs is a participant in the Amazon Services LLC Associates Program, an affiliate advertising program.
I may earn small commission off of your purchase.